Pulse-Train Triggering Circuit for Power Control

Typical circuit for welding equipment shown on the following circuit diagram. Turn on delay can be controlled accurately with Potentiometer P2. We can discharge C1 at each line zero voltage using DB1 diode bridge and R6-R7 resistors. The voltage charge will be reset at each new half line cycle and the turn-on delay will be maintained the same. Through both potentiometers, the Transil reduces power dissipation. Here’s the circuit diagram:

Note: Transil is a transient voltage suppression diode trademarked by STMicroelectronics

2N3055 Variable Power Supply

This is simple 2N3055 Variable power supply circuit. This circuit has some advantages such as it it can deliver an output voltage between 1,5 V and 15 V with a 500 mA maximum current and low production cost. If the current consumption do not exceed 350 mA, the circuit has stabilization of better than 2%. Here is the circuit:

The potentiometer is used to vary the output voltage. When overloading is happened, a buzzer will sound a alarm. This circuit use auto-oscillating buzzer, type 24. P1 slider voltage and the output voltage are compared by T4. The T3-T5 Darlington base current is stopped when the P1 slider voltage is 0,65 V higher than the adjusted voltage. C1 and B1 are used to filter the 18V, 1A transformer voltage. The Bz1 starts the alarm, when the output current is more then 500 mA.

Lab Power Supply

his bench power supply circuit is suitable for your electronic experiment lab. This circuit can be built no on a piece of copper-laminate. The Bench Power Supply was designed to use old lantern batteries, “D”, and “C”. This circuit can produce at least 12v -14v from  old batteries and cells. As a heat-sink, this  circuit uses a board. To connect the components, enamelled wire is used. To keep the transistor cool, it can be bolted. Here is the schematic diagram of the  circuit:


The zener is used to regulate The output of this power supply. So, there is voltage approx 1.7v across a red LED and 8.2v between the base-emitter leads of a BC547 transistor (in reverse bias). This circuit can give 0v – 9v at 500mA depending on the life left in the cells used. To indicate the circuit is ON, LED is used. The 10k pot is used to adjust the output voltage

Selectable Voltages 6V, 9V, and 12V Linear Voltage Regulator

We can build a multiple voltage power supply 6, 9, and 12V  (AC-DC Adapter) with the circuit shown in the following schematic diagram.  Not only provide multiple voltage output with single voltage supply, this circuit add the benefit of regulating the voltage for better stability. The TIP31 transistor should be installed with proper heat-sink to prevent overheating. A transformer with rectifier diodes and filtering capacitor can be used to supply this circuit. You can use 1 A 15V transformer with 2200uF filtering capacitor for the AC to DC adapter.

Automotive/Car Power Adapter For 3V, 6V, or 9V DC Operated Devices

In automotive environment, it’s common that only single voltage power outlet is available. Using  the very popular LM317 voltage regulator IC, we can build a general purpose DC adapter to adapt car’s power outlet voltage (12-14 Volts) to supply small DC devices requiring lower voltage level. On the following schematic diagram for the car power adapter,  we can see that the output voltage depends on the value of R1, which is manipulated by connecting R3 or R4 via switch to program the output.  When connected through the switch, R1 will be in parallel with the selected resistor so the total resistance changes to affect the output voltage.


Phase Delay Network for 3D Audio Enhancement

3D enhancement is needed to create a fully 3-dimensional sound for most stereo multimedia products. Usually, simple phase-delay circuits is used to produce a widening effect on the perceived sound field. However, there is transaural acoustic crosstalk effect. The following figure shows transaural acoustic crosstalk effect and schematic diagram of simple phase-delay circuits :


Transaural acoustic crosstalk effect is a condition where some sound from the right-hand stereo speaker reaching the left ear, and vice-versa.
This is an active circuit that uses first-order section to present a phase-shift filter with ft of 1kHz for the quadrature signal  and ft = 10kHz for the linear signal. It will produce 90° phase shift between the quadrature and linear signals over the audio bandwidth of 1kHz to 10kHz.

Video-Based Motion Sensor

The design is primarily based on an analog integrator circuit. The circuit integrates (i.e., sums) the input-voltage signal over a defined period of time. Based on an op-amp, the ideal circuit is shown in Figure 3. The factor –(1/RC) is constant, so the resulting output is inverted and proportional to the sum of the integrated values (i.e., proportional to the average of the signal in the integrated period of time). This is all it takes to “compress” the analog video signal.

Although it seems complicated at first sight, it should be fairly simple by now (see Figure 4). The integrator is implemented by a National Semiconductor LM6134B, a fast, rail-to-rail, single-power supply op-amp (U3). The output should then be quickly converted to digital because the input changes very fast. Analog Devices’s AD9280 ADC (U1) with 32 Msps was selected so a 50-ns capture could be performed. The AD9280 was configured for 1 to 2 V of input to use the internal 2-V reference. A 1-V reference was obtained with U3:D. To prepare the input for this range, the signal was inverted with the op-amp U3:A and clamped just less than 1 V with U3:B (see Figure 2). Just before the integration, the video was inverted under 1 V. The integrator was designed to output a 1-V signal when a ground-referenced, fully saturated video signal was input in 4.3-µs intervals. Note that the integrator is offset at 1 V. So, after signal integration, the ADC will receive a signal that is from 1 to 2 V as required. The integration capacitor C12 is a low-leakage metalized polyester film type. R8 is a metal film resistor, also a 1% part. To reset the integrator, a 74HC4066 analog switch (U4) is used. It is controlled by the ATmega88 through the INT_ENABLE signal. The video frame start is detected through the INT0 interrupt when the odd/even output of U2 changes. By using the odd/even output instead of the vertical synchronization output, the same pin can be used to determine if it is an even or odd frame. The video-line start is detected using the composite synchronization output of U2, which is connected to the AVR’s INT1 input.
The video output block performs the video highlighting. It is a transistor-based video amplifier that increases the gain when its enable signal is asserted low. Highlighting is used to show where a movement has occurred in the previous frame. It also gives you feedback on the blocks that will be ignored while executing the masking commands.
The only digital components in the design are the ATmega88 (U5), which has 8 KB of flash memory and 1 KB of RAM, a 20-MHz clock, and an RS-232-level converter (U6). The ATmega88, with its versatile instruction set, was key to developing this project. The generous 32 registers, bit-manipulation instructions, and word-pointer registers allowed the integration algorithm to fit in 4.7 µs, where the next sample should be captured. The software was developed in assembler to achieve the large optimizations required. I used AVR Studio 4 as the developing and testing environment.
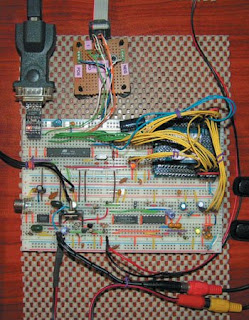
The circuit requires a regulated 5-V power supply for the analog and digital circuits. A single regulator can be used for both the analog and digital parts, provided that the signals are well filtered, and there is a single point of contact between the ground rails. Take a look at the motion-sensor prototype in Photo 2.

LCD thermometer for engine of vehicle with IC-L7136 circuit

Many car product in thermo sensor ,so i would like to show you the LCD thermo sensor which can modify for your car.


LCD car thermo circuit
When the thermometer is the IC thermo sensor (S8100) or diode (1S1588) is used as thermal sensors.
When using the IC thermo sensor, the thermometry to +100 ° C -40 ° C are possible.
Also, when using the diode, measured at 150 ° C from -20 ° C are possible. Both sensors are contained in the set.
This time I used the diode as a heat sensor to measure more than 100 ° C. ICL 7136 of Intersil (Harris) used for the thermometer and measure the voltage change minute by management before the temperature diodes.
The 3-1/2 digit LCD (SP521PR) applied to the screen. The most significant digit can display a “1″.
ICL7136 electricity consumption is very small and it is possible to run about 3 months with 9-V cell. The essential parts are contained in the set. The plastic casing and the cell is contained. But there is a cable connecting the sensor.

Automatic Intruder Burglar Alarm


This is a burglar alarm circuit written by Ron J. Its features include automatic Exit and Entry delays and a timed Bell/Siren Cut-Off. It’s designed to be used with the usual types of normally-closed input devices such as – magnetic reed contacts – micro switches – foil tape – and PIRs. But it can be Easily Modified to accept normally-open triggering devices – such as pressure mats.
Hot It works
This intruder burglar alarm is easy to use. First check that the building is secure and that the green LED is lit. Then move SW1 to the “set” position. The red LED will light. You now have about 30 seconds to leave the building. When you return and open the door – the Buzzer will sound. You then have about 30 seconds to move SW1 to the “off” position. If you fail to do so – the relay will energize and the Siren will sound.
While at least one of the switches in the normally-closed loop remains open – the Siren will continue to sound. However, about 15-minutes after the loop has been restored – the relay will de-energize – the Siren will Cut-Off – and the alarm will Reset. Of course, you can turn the Siren off at any time by moving SW1 to the “off” position.

Program for Deadlock detection algorithm

INPUT:
enter total no. of processes : 4
enter claim matrix :
0 1 0 0 1
0 0 1 0 1
0 0 0 0 1
1 0 1 0 1
enter allocation matrix :
1 0 1 1 0
1 1 0 0 0
0 0 0 1 0
0 0 0 0 0
enter resource vector :
2 1 1 2 1
enter the availability vector :
0 0 0 0 1
OUTPUT :
deadlock causing processes are : 1 2
#include<stdio.h>
#include<conio.h>
void main()
{
int found,flag,l,p[4][5],tp,c[4][5],i,j,k=1,m[5],r[5],a[5],temp[5],sum=0;
clrscr();
printf("enter total no of processes");
scanf("%d",&tp);
printf("enter clain matrix");
for(i=1;i<=4;i++)
for(j=1;j<=5;j++)
{
scanf("%d",&c[i][j]);
}
printf("enter allocation matrix");
for(i=1;i<=4;i++)
for(j=1;j<=5;j++)
{
scanf("%d",&p[i][j]);
}
printf("enter resource vector:\n");
for(i=1;i<=5;i++)
{
scanf("%d",&r[i]);
}
printf("enter availability vector:\n");
for(i=1;i<=5;i++)
{
scanf("%d",&a[i]);
temp[i]=a[i];
}
for(i=1;i<=4;i++)
{
sum=0;
for(j=1;j<=5;j++)
{
sum+=p[i][j];
}
if(sum==0)
{
m[k]=i;
k++;
}
}
for(i=1;i<=4;i++)
{
for(l=1;l<k;l++)
if(i!=m[l])
{
flag=1;
for(j=1;j<=5;j++)
if(c[i][j]>temp[j])
{
flag=0;
break;
}
}
if(flag==1)
{
m[k]=i;
k++;
for(j=1;j<=5;j++)
temp[j]+=p[i][j];
}
}
printf("deadlock causing processes are:");
for(j=1;j<=tp;j++)
{
found=0;
for(i=1;i<k;i++)
{
if(j==m[i])
found=1;
}
if(found==0)
printf("%d\t",j);
}
getch();
}

Types of Stepper Motors

Stepper motors come in two varieties: permanent magnet and variable reluctance. (The reader may be familiar with hybrid motors, which are indistinguishable from permanent magnet motors from the controller’s point of view.) Permanent magnet motors usually have two independent windings, with or without center taps. Center-tapped windings are used in uni polar permanent magnet motors. This can you see in the figure (1).

Bipolar permanent magnet and hybrid motors are constructed with a mechanism similar to that used in uni polar motor, except that the two windings are wired without center taps in the Figure 2. The motor itself is simpler, but the drive circuitry needed to reverse the polarity of each pair of motor poles is more complex.
Stepper motors come in a wide range of angular resolutions. The coarsest motors typically turn 90 degrees per step, whereas high resolution permanent-magnet motors can commonly handle 1.8 or even 0.72 degrees per step. With the appropriate controller, most permanent magnet and hybrid motors can be run in half steps, and some controllers can handle smaller fractional steps or micro steps. For permanent magnet and variable-reluctance stepper motors, when one winding of the motor is energized, the rotor (under no load) snaps to a fixed angle. It holds that angle until the torque exceeds the holding torque of the motor, at which point the rotor turns, trying to hold at each successive equilibrium point.

 
Design by Free WordPress Themes | Bloggerized by Lasantha - Premium Blogger Themes | cheap international calls